

My need to have things organized and matching has gotten the best of me. I felt like my pin boards had gotten very cluttered. I look at the pictures rather than the small text above my boards to know whats in there, that's just how my brain works. I frequently refer to my boards for tips, tricks, and how-to's. So being able to find what I need quickly is a must, especially when you only have 30 minutes to get it done before your baby starts crying for you!
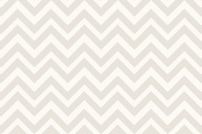
To start I Googled a large pattern that I liked (for me it was chevron). I saved it to my desktop and opened it in Adobe Photoshop (here comes the hardest part). If you don't have Adobe Photoshop stay tuned below, you can download the chevron board cover and use Paint to add text.

Then in the top tool bar select "Image." In the drop down menu that appears selects "Canvas Size." Re-size the canvas to be 202 pixels in width by 134 pixels in height. Make sure that you have selected "pixels" and not "inches" or any other form of measurement. Hit OK.

Then a window will pop up telling you that clipping will occur. This is okay, select "Proceed."

Your image should now be this size. Hardest part over. Phew!

Select the Horizontal Type Tool (T) or the text tool and select the are you want your text in. You can also select the font and font size you'd like. I used Times New Roman in font size 36 pt.

Select the Move Tool (V) and move your text until it is centered on your image.

Now save your image. To do this select "File" in the top tool bar. In the drop down menu select "Save As." In the window that pops up type in your "File Name" and make sure to change the "Format" to JPEG. Now Save.

If you don't have Adobe Photoshop you can download the re-sized image below. Then open the image in Paint, like so. Select the text button and select the area you want to place your text. If you have Adobe Photoshop, skip ahead.
{here} gray chevron print background
{here} green paisley print background

Here you can select your font style and size. I used Times New Roman in font size 20.

Move your mouse over the left hand corner of your selected area. An arrow should appear, click and hold your mouse button while moving the box diagonally down. This will move your text into the center. Once this is done, save your image.

Now go to your Pinterest Boards page. If you want to rearrange your boards alphabetically like I did follow these steps. Otherwise, skip ahead.
Next to "Edit Profile" select the button that looks like a board.

Rearrange your boards alphabetically, or as you'd like. When you're done with that make sure you click the red check mark to save your new arrangement!

To add your board cover, click the "Add+" button in the upper right hand corner of your page.

This window will appear. Select "Upload a Pin."

Click the "Browse.." button and select your image. In the drop down menu select the board you want the image to go to. Then click "Pin It." Its the same a when you pin anything to Pinterest, but you're uploading a picture from your computer instead of pinning a page.

Now go back to your Boards page. Move your cursor over the board you just pinned to. A button that says "Edit Board Cover" should appear. Click it. This window will pop up. Click "Set Cover." Although this last step is tedious, you need to do it otherwise the next time you pin something to this board the picture will change.

There you have it! Just change the text for each board. To keep it looking nice when you make a new board, just repeat this process. Its a long tutorial, but its quite simple and quick in reality! It took me maybe 30 minutes total to do all my boards. Now I can see what I'm looking for with ease and it doesn't look cluttered.
I wish there were a way to hide all of these new "pins" on my Pinterest feed for my poor followers sakes! But, there's not, so sorry!

Happy, organized pinning!


No comments:
Post a Comment